Ansible之Playbook#
Playbook介绍#
playbook参考文档
Playbook与ad-hoc相比,是一种完全不同的运用ansible的方式,类似与saltstack的state状态文件。ad-hoc无法持久使用,playbook可以持久使用。
playbook是由一个或多个play组成的列表,play的主要功能在于将事先归并为一组的主机装扮成事先通过ansible中的task定义好的角色。从根本上来讲,所谓的task无非是调用ansible的一个module。将多个play组织在一个playbook中,即可以让它们联合起来按事先编排的机制完成某一任务
Playbook核心元素#
Hosts 执行的远程主机列表
Tasks 任务集
Varniables 内置变量或自定义变量在playbook中调用
Templates 模板,即使用模板语法的文件,比如配置文件等
Handlers 和notity结合使用,由特定条件触发的操作,满足条件方才执行,否则不执行
tags 标签,指定某条任务执行,用于选择运行playbook中的部分代码。
Playbook语法#
playbook使用yaml语法格式,后缀可以是yaml,也可以是yml。
在单一一个playbook文件中,可以连续三个连子号(—)区分多个play。还有选择性的连续三个点好(…)用来表示play的结尾,也可省略。
次行开始正常写playbook的内容,一般都会写上描述该playbook的功能。
使用#号注释代码。
缩进必须统一,不能空格和tab混用。
缩进的级别也必须是一致的,同样的缩进代表同样的级别,程序判别配置的级别是通过缩进结合换行实现的。
YAML文件内容和Linux系统大小写判断方式保持一致,是区分大小写的,k/v的值均需大小写敏感
k/v的值可同行写也可以换行写。同行使用:分隔。
v可以是个字符串,也可以是一个列表
一个完整的代码块功能需要最少元素包括 name: task
一个简单的示例#
复制代码
创建playbook文件
[root@ansible ~]# cat playbook01.yml
— #固定格式
hosts: 192.168.1.31 #定义需要执行主机
remote_user: root #远程用户
vars: #定义变量
http_port: 8088 #变量tasks: #定义一个任务的开始
- name: create new file #定义任务的名称
file: name=/tmp/playtest.txt state=touch #调用模块,具体要做的事情 - name: create new user
user: name=test02 system=yes shell=/sbin/nologin - name: install package
yum: name=httpd - name: config httpd
template: src=./httpd.conf dest=/etc/httpd/conf/httpd.conf
notify: #定义执行一个动作(action)让handlers来引用执行,与handlers配合使用- restart apache #notify要执行的动作,这里必须与handlers中的name定义内容一致
- name: copy index.html
copy: src=/var/www/html/index.html dest=/var/www/html/index.html - name: start httpd
service: name=httpd state=started
handlers: #处理器:更加tasks中notify定义的action触发执行相应的处理动作 - name: restart apache #要与notify定义的内容相同
service: name=httpd state=restarted #触发要执行的动作
- name: create new file #定义任务的名称
#测试页面准备
[root@ansible ~]# echo “
playbook test file
“ >>/var/www/html/index.html#配置文件准备
[root@ansible ~]# cat httpd.conf |grep ^Listen
Listen {{ http_port }}
#执行playbook, 第一次执行可以加-C选项,检查写的playbook是否ok
[root@ansible ~]# ansible-playbook playbook01.yml
PLAY [192.168.1.31] *
TASK [Gathering Facts] **
ok: [192.168.1.31]
TASK [create new file] **
changed: [192.168.1.31]
TASK [create new user] **
changed: [192.168.1.31]
TASK [install package] **
changed: [192.168.1.31]
TASK [config httpd] *
changed: [192.168.1.31]
TASK [copy index.html] **
changed: [192.168.1.31]
TASK [start httpd] **
changed: [192.168.1.31]
PLAY RECAP **
192.168.1.31 : ok=7 changed=6 unreachable=0 failed=0 skipped=0 rescued=0 ignored=0
验证上面playbook执行的结果
[root@ansible ~]# ansible 192.168.1.31 -m shell -a ‘ls /tmp/playtest.txt && id test02’
192.168.1.31 | CHANGED | rc=0 >>
/tmp/playtest.txt
uid=990(test02) gid=985(test02) 组=985(test02)
[root@ansible ~]# curl 192.168.1.31:8088
playbook test file
复制代码 Playbook的运行方式# 通过ansible-playbook命令运行 格式:ansible-playbook复制代码
[root@ansible PlayBook]# ansible-playbook -h
#ansible-playbook常用选项:
–check or -C #只检测可能会发生的改变,但不真正执行操作
–list-hosts #列出运行任务的主机
–list-tags #列出playbook文件中定义所有的tags
–list-tasks #列出playbook文件中定义的所以任务集
–limit #主机列表 只针对主机列表中的某个主机或者某个组执行
-f #指定并发数,默认为5个
-t #指定tags运行,运行某一个或者多个tags。(前提playbook中有定义tags)
-v #显示过程 -vv -vvv更详细
复制代码
Playbook中元素属性#
主机与用户#
在一个playbook开始时,最先定义的是要操作的主机和用户
- hosts: 192.168.1.31
remote_user: root
除了上面的定义外,还可以在某一个tasks中定义要执行该任务的远程用户
tasks:
- name: run df -h
remote_user: test
shell: name=df -h
还可以定义使用sudo授权用户执行该任务
复制代码
tasks:
- name: run df -h
sudo_user: test
sudo: yes
shell: name=df -h
复制代码
tasks任务列表#
每一个task必须有一个名称name,这样在运行playbook时,从其输出的任务执行信息中可以很清楚的辨别是属于哪一个task的,如果没有定义 name,action的值将会用作输出信息中标记特定的task。
每一个playbook中可以包含一个或者多个tasks任务列表,每一个tasks完成具体的一件事,(任务模块)比如创建一个用户或者安装一个软件等,在hosts中定义的主机或者主机组都将会执行这个被定义的tasks。
复制代码
tasks:
- name: create new file
file: path=/tmp/test01.txt state=touch - name: create new user
user: name=test001 state=present
复制代码
Handlers与Notify#
很多时候当我们某一个配置发生改变,我们需要重启服务,(比如httpd配置文件文件发生改变了)这时候就可以用到handlers和notify了;
(当发生改动时)notify actions会在playbook的每一个task结束时被触发,而且即使有多个不同task通知改动的发生,notify actions知会被触发一次;比如多个resources指出因为一个配置文件被改动,所以apache需要重启,但是重新启动的操作知会被执行一次。
复制代码
[root@ansible ~]# cat httpd.yml
#用于安装httpd并配置启动
hosts: 192.168.1.31
remote_user: roottasks:
- name: install httpd
yum: name=httpd state=installed - name: config httpd
template: src=/root/httpd.conf dest=/etc/httpd/conf/httpd.conf
notify:- restart httpd
- name: start httpd
service: name=httpd state=started
handlers:
- name: restart httpd
service: name=httpd state=restarted
- name: install httpd
#这里只要对httpd.conf配置文件作出了修改,修改后需要重启生效,在tasks中定义了restart httpd这个action,然后在handlers中引用上面tasks中定义的notify。
复制代码
Playbook中变量的使用#
环境说明:这里配置了两个组,一个apache组和一个nginx组
复制代码
[root@ansible PlayBook]# cat /etc/ansible/hosts
[apache]
192.168.1.36
192.168.1.33
[nginx]
192.168.1.3[1:2]
复制代码
命令行指定变量#
执行playbook时候通过参数-e传入变量,这样传入的变量在整个playbook中都可以被调用,属于全局变量
复制代码
[root@ansible PlayBook]# cat variables.yml
hosts: all
remote_user: roottasks:
- name: install pkg
yum: name={{ pkg }}
- name: install pkg
#执行playbook 指定pkg
[root@ansible PlayBook]# ansible-playbook -e “pkg=httpd” variables.yml
复制代码
hosts文件中定义变量#
在/etc/ansible/hosts文件中定义变量,可以针对每个主机定义不同的变量,也可以定义一个组的变量,然后直接在playbook中直接调用。注意,组中定义的变量没有单个主机中的优先级高。
复制代码
编辑hosts文件定义变量
[root@ansible PlayBook]# vim /etc/ansible/hosts
[apache]
192.168.1.36 webdir=/opt/test #定义单个主机的变量
192.168.1.33
[apache:vars] #定义整个组的统一变量
webdir=/web/test
[nginx]
192.168.1.3[1:2]
[nginx:vars]
webdir=/opt/web
编辑playbook文件
[root@ansible PlayBook]# cat variables.yml
hosts: all
remote_user: roottasks:
- name: create webdir
file: name={{ webdir }} state=directory #引用变量
- name: create webdir
执行playbook
[root@ansible PlayBook]# ansible-playbook variables.yml
复制代码
playbook文件中定义变量#
编写playbook时,直接在里面定义变量,然后直接引用,可以定义多个变量;注意:如果在执行playbook时,又通过-e参数指定变量的值,那么会以-e参数指定的为准。
复制代码
编辑playbook
[root@ansible PlayBook]# cat variables.yml
hosts: all
remote_user: root
vars: #定义变量
pkg: nginx #变量1
dir: /tmp/test1 #变量2tasks:
- name: install pkg
yum: name={{ pkg }} state=installed #引用变量 - name: create new dir
file: name={{ dir }} state=directory #引用变量
- name: install pkg
执行playbook
[root@ansible PlayBook]# ansible-playbook variables.yml
如果执行时候又重新指定了变量的值,那么会已重新指定的为准
[root@ansible PlayBook]# ansible-playbook -e “dir=/tmp/test2” variables.yml
复制代码
调用setup模块获取变量#
setup模块默认是获取主机信息的,有时候在playbook中需要用到,所以可以直接调用。常用的参数参考
复制代码
编辑playbook文件
[root@ansible PlayBook]# cat variables.yml
hosts: all
remote_user: roottasks:
- name: create file
file: name={{ ansible_fqdn }}.log state=touch #引用setup中的ansible_fqdn
- name: create file
执行playbook
[root@ansible PlayBook]# ansible-playbook variables.yml
复制代码
独立的变量YAML文件中定义#
为了方便管理将所有的变量统一放在一个独立的变量YAML文件中,laybook文件直接引用文件调用变量即可。
复制代码
定义存放变量的文件
[root@ansible PlayBook]# cat var.yml
var1: vsftpd
var2: httpd
编写playbook
[root@ansible PlayBook]# cat variables.yml
hosts: all
remote_user: root
vars_files: #引用变量文件- ./var.yml #指定变量文件的path(这里可以是绝对路径,也可以是相对路径)
tasks:
- name: install package
yum: name={{ var1 }} #引用变量 - name: create file
file: name=/tmp/{{ var2 }}.log state=touch #引用变量
执行playbook
[root@ansible PlayBook]# ansible-playbook variables.yml
复制代码
Playbook中标签的使用#
一个playbook文件中,执行时如果想执行某一个任务,那么可以给每个任务集进行打标签,这样在执行的时候可以通过-t选择指定标签执行,还可以通过–skip-tags选择除了某个标签外全部执行等。
复制代码
编辑playbook
[root@ansible PlayBook]# cat httpd.yml
hosts: 192.168.1.31
remote_user: roottasks:
name: install httpd
yum: name=httpd state=installed
tags: inhttpdname: start httpd
service: name=httpd state=started
tags: sthttpdname: restart httpd
service: name=httpd state=restarted
tags:- rshttpd
- rs_httpd
正常执行的结果
[root@ansible PlayBook]# ansible-playbook httpd.yml
PLAY [192.168.1.31] **
TASK [Gathering Facts] ***
ok: [192.168.1.31]
TASK [install httpd] *
ok: [192.168.1.31]
TASK [start httpd] ***
ok: [192.168.1.31]
TASK [restart httpd] *
changed: [192.168.1.31]
PLAY RECAP ***
192.168.1.31 : ok=4 changed=1 unreachable=0 failed=0 skipped=0 rescued=0 ignored=0
复制代码
1)通过-t选项指定tags进行执行
复制代码
通过-t指定tags名称,多个tags用逗号隔开
[root@ansible PlayBook]# ansible-playbook -t rshttpd httpd.yml
PLAY [192.168.1.31] **
TASK [Gathering Facts] ***
ok: [192.168.1.31]
TASK [restart httpd] *
changed: [192.168.1.31]
PLAY RECAP ***
192.168.1.31 : ok=2 changed=1 unreachable=0 failed=0 skipped=0 rescued=0 ignored=0
复制代码
2)通过–skip-tags选项排除不执行的tags
复制代码
[root@ansible PlayBook]# ansible-playbook –skip-tags inhttpd httpd.yml
PLAY [192.168.1.31] **
TASK [Gathering Facts] ***
ok: [192.168.1.31]
TASK [start httpd] ***
ok: [192.168.1.31]
TASK [restart httpd] *
changed: [192.168.1.31]
PLAY RECAP ***
192.168.1.31 : ok=3 changed=1 unreachable=0 failed=0 skipped=0 rescued=0 ignored=0
复制代码
Playbook中模板的使用#
template模板为我们提供了动态配置服务,使用jinja2语言,里面支持多种条件判断、循环、逻辑运算、比较操作等。其实说白了也就是一个文件,和之前配置文件使用copy一样,只是使用copy,不能根据服务器配置不一样进行不同动态的配置。这样就不利于管理。
说明:
1、多数情况下都将template文件放在和playbook文件同级的templates目录下(手动创建),这样playbook文件中可以直接引用,会自动去找这个文件。如果放在别的地方,也可以通过绝对路径去指定。
2、模板文件后缀名为.j2。
循环参考
示例:通过template安装httpd
1)playbook文件编写
复制代码
[root@ansible PlayBook]# cat testtmp.yml
#模板示例
hosts: all
remote_user: root
vars:- listen_port: 88 #定义变量
tasks:
- name: Install Httpd
yum: name=httpd state=installed - name: Config Httpd
template: src=httpd.conf.j2 dest=/etc/httpd/conf/httpd.conf #使用模板
notify: Restart Httpd - name: Start Httpd
service: name=httpd state=started
handlers:
- name: Restart Httpd
service: name=httpd state=restarted
复制代码
2)模板文件准备,httpd配置文件准备,这里配置文件端口使用了变量
[root@ansible PlayBook]# cat templates/httpd.conf.j2 |grep ^Listen
Listen {{ listen_port }}
3)查看目录结构
复制代码
目录结构
[root@ansible PlayBook]# tree .
.
├── templates
│ └── httpd.conf.j2
└── testtmp.yml
1 directory, 2 files
复制代码
4)执行playbook,由于192.168.1.36那台机器是6的系统,模板文件里面的配置文件是7上面默认的httpd配置文件,httpd版本不一样(6默认版本为2.2.15,7默认版本为2.4.6),所以拷贝过去后启动报错。下面使用playbook中的判断语句进行处理;此处先略过
复制代码
[root@ansible PlayBook]# ansible-playbook testtmp.yml
PLAY [all] **
TASK [Gathering Facts] **
ok: [192.168.1.36]
ok: [192.168.1.32]
ok: [192.168.1.33]
ok: [192.168.1.31]
TASK [Install Httpd] ****
ok: [192.168.1.36]
ok: [192.168.1.33]
ok: [192.168.1.32]
ok: [192.168.1.31]
TASK [Config Httpd] *
changed: [192.168.1.31]
changed: [192.168.1.33]
changed: [192.168.1.32]
changed: [192.168.1.36]
TASK [Start Httpd] **
fatal: [192.168.1.36]: FAILED! => {“changed”: false, “msg”: “httpd: Syntax error on line 56 of /etc/httpd/conf/httpd.conf: Include directory ‘/etc/httpd/conf.modules.d’ not found\n”}
changed: [192.168.1.32]
changed: [192.168.1.33]
changed: [192.168.1.31]
RUNNING HANDLER [Restart Httpd] *
changed: [192.168.1.31]
changed: [192.168.1.32]
changed: [192.168.1.33]
PLAY RECAP **
192.168.1.31 : ok=5 changed=3 unreachable=0 failed=0 skipped=0 rescued=0 ignored=0
192.168.1.32 : ok=5 changed=3 unreachable=0 failed=0 skipped=0 rescued=0 ignored=0
192.168.1.33 : ok=5 changed=3 unreachable=0 failed=0 skipped=0 rescued=0 ignored=0
192.168.1.36 : ok=3 changed=1 unreachable=0 failed=1 skipped=0 rescued=0 ignored=0
复制代码
template之when#
when语句参考
条件测试:如果需要根据变量、facts或此前任务的执行结果来做为某task执行与否的前提时要用到条件测试,通过when语句执行,在task中使用jinja2的语法格式、
when语句:
在task后添加when子句即可使用条件测试;when语句支持jinja2表达式语法。
类似这样:
复制代码
tasks:
- command: /bin/false
register: result
ignore_errors: True - command: /bin/something
when: result|failed - command: /bin/something_else
when: result|success - command: /bin/still/something_else
when: result|skipped
复制代码
示例:通过when语句完善上面的httpd配置
1)准备两个配置文件,一个centos6系统httpd配置文件,一个centos7系统httpd配置文件。
复制代码
[root@ansible PlayBook]# tree templates/
templates/
├── httpd6.conf.j2 #6系统2.2.15版本httpd配置文件
└── httpd7.conf.j2 #7系统2.4.6版本httpd配置文件
0 directories, 2 files
复制代码
2)修改playbook文件,通过setup模块获取系统版本去判断。setup常用模块
复制代码
[root@ansible PlayBook]# cat testtmp.yml
#when示例
hosts: all
remote_user: root
vars:- listen_port: 88
tasks:
- name: Install Httpd
yum: name=httpd state=installed - name: Config System6 Httpd
template: src=httpd6.conf.j2 dest=/etc/httpd/conf/httpd.conf
when: ansible_distribution_major_version == “6” #判断系统版本,为6便执行上面的template配置6的配置文件
notify: Restart Httpd - name: Config System7 Httpd
template: src=httpd7.conf.j2 dest=/etc/httpd/conf/httpd.conf
when: ansible_distribution_major_version == “7” #判断系统版本,为7便执行上面的template配置7的配置文件
notify: Restart Httpd - name: Start Httpd
service: name=httpd state=started
handlers:
- name: Restart Httpd
service: name=httpd state=restarted
复制代码
3)执行playbook
复制代码
[root@ansible PlayBook]# ansible-playbook testtmp.yml
PLAY [all] **
TASK [Gathering Facts] **
ok: [192.168.1.31]
ok: [192.168.1.32]
ok: [192.168.1.33]
ok: [192.168.1.36]
TASK [Install Httpd] ****
ok: [192.168.1.32]
ok: [192.168.1.33]
ok: [192.168.1.31]
ok: [192.168.1.36]
TASK [Config System6 Httpd] *
skipping: [192.168.1.33]
skipping: [192.168.1.31]
skipping: [192.168.1.32]
changed: [192.168.1.36]
TASK [Config System7 Httpd] *
skipping: [192.168.1.36]
changed: [192.168.1.33]
changed: [192.168.1.31]
changed: [192.168.1.32]
TASK [Start Httpd] **
ok: [192.168.1.36]
ok: [192.168.1.31]
ok: [192.168.1.32]
ok: [192.168.1.33]
RUNNING HANDLER [Restart Httpd] *
changed: [192.168.1.33]
changed: [192.168.1.31]
changed: [192.168.1.32]
changed: [192.168.1.36]
PLAY RECAP **
192.168.1.31 : ok=5 changed=2 unreachable=0 failed=0 skipped=1 rescued=0 ignored=0
192.168.1.32 : ok=5 changed=2 unreachable=0 failed=0 skipped=1 rescued=0 ignored=0
192.168.1.33 : ok=5 changed=2 unreachable=0 failed=0 skipped=1 rescued=0 ignored=0
192.168.1.36 : ok=5 changed=2 unreachable=0 failed=0 skipped=1 rescued=0 ignored=0
复制代码
template之with_items#
with_items迭代,当有需要重复性执行的任务时,可以使用迭代机制。
对迭代项的引用,固定变量名为“item”,要在task中使用with_items给定要迭代的元素列表。
列表格式:
字符串
字典
示例1:通过with_items安装多个不同软件
编写playbook
复制代码
[root@ansible PlayBook]# cat testwith.yml
示例with_items
hosts: all
remote_user: roottasks:
- name: Install Package
yum: name={{ item }} state=installed #引用item获取值
with_items: #定义with_items- httpd
- vsftpd
- nginx
复制代码
上面tasks写法等同于:
- name: Install Package
复制代码
- hosts: all
remote_user: root
tasks:- name: Install Httpd
yum: name=httpd state=installed - name: Install Vsftpd
yum: name=vsftpd state=installed - name: Install Nginx
yum: name=nginx state=installed
复制代码
示例2:通过嵌套子变量创建用户并加入不同的组
- name: Install Httpd
1)编写playbook
复制代码
[root@ansible PlayBook]# cat testwith01.yml
示例with_items嵌套子变量
hosts: all
remote_user: roottasks:
name: Create New Group
group: name={{ item }} state=present
with_items:- group1
- group2
- group3
name: Create New User
user: name={{ item.name }} group={{ item.group }} state=present
with_items:- { name: ‘user1’, group: ‘group1’ }
- { name: ‘user2’, group: ‘group2’ }
- { name: ‘user3’, group: ‘group3’ }
复制代码
2)执行playbook并验证
复制代码
执行playbook
[root@ansible PlayBook]# ansible-playbook testwith01.yml
验证是否成功创建用户及组
[root@ansible PlayBook]# ansible all -m shell -a ‘tail -3 /etc/passwd’
192.168.1.36 | CHANGED | rc=0 >>
user1:x:500:500::/home/user1:/bin/bash
user2:x:501:501::/home/user2:/bin/bash
user3:x:502:502::/home/user3:/bin/bash
192.168.1.32 | CHANGED | rc=0 >>
user1:x:1001:1001::/home/user1:/bin/bash
user2:x:1002:1002::/home/user2:/bin/bash
user3:x:1003:1003::/home/user3:/bin/bash
192.168.1.31 | CHANGED | rc=0 >>
user1:x:1002:1003::/home/user1:/bin/bash
user2:x:1003:1004::/home/user2:/bin/bash
user3:x:1004:1005::/home/user3:/bin/bash
192.168.1.33 | CHANGED | rc=0 >>
user1:x:1001:1001::/home/user1:/bin/bash
user2:x:1002:1002::/home/user2:/bin/bash
user3:x:1003:1003::/home/user3:/bin/bash
复制代码
template之for if#
通过使用for,if可以更加灵活的生成配置文件等需求,还可以在里面根据各种条件进行判断,然后生成不同的配置文件、或者服务器配置相关等。
示例1
1)编写playbook
复制代码
[root@ansible PlayBook]# cat testfor01.yml
template for 示例
hosts: all
remote_user: root
vars:
nginx_vhost_port:- 81 - 82 - 83tasks:
- name: Templage Nginx Config
template: src=nginx.conf.j2 dest=/tmp/nginx_test.conf
复制代码
2)模板文件编写
- name: Templage Nginx Config
复制代码
循环playbook文件中定义的变量,依次赋值给port
[root@ansible PlayBook]# cat templates/nginx.conf.j2
{% for port in nginx_vhost_port %}
server{
listen: {{ port }};
server_name: localhost;
}
{% endfor %}
复制代码
3)执行playbook并查看生成结果
复制代码
[root@ansible PlayBook]# ansible-playbook testfor01.yml
去到一个节点看下生成的结果发现自动生成了三个虚拟主机
[root@linux ~]# cat /tmp/nginx_test.conf
server{
listen: 81;
server_name: localhost;
}
server{
listen: 82;
server_name: localhost;
}
server{
listen: 83;
server_name: localhost;
}
复制代码
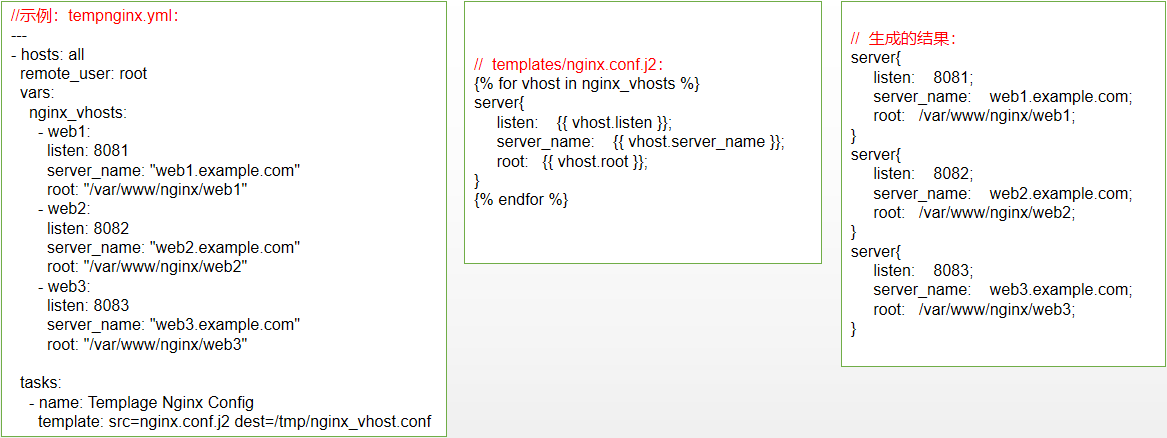
示例2
1)编写playbook
复制代码
[root@ansible PlayBook]# cat testfor02.yml
template for 示例
hosts: all
remote_user: root
vars:
nginx_vhosts:- web1: listen: 8081 server_name: "web1.example.com" root: "/var/www/nginx/web1" - web2: listen: 8082 server_name: "web2.example.com" root: "/var/www/nginx/web2" - web3: listen: 8083 server_name: "web3.example.com" root: "/var/www/nginx/web3"tasks:
- name: Templage Nginx Config
template: src=nginx.conf.j2 dest=/tmp/nginx_vhost.conf
复制代码
2)模板文件编写
- name: Templage Nginx Config
复制代码
[root@ansible PlayBook]# cat templates/nginx.conf.j2
{% for vhost in nginx_vhosts %}
server{
listen: {{ vhost.listen }};
server_name: {{ vhost.server_name }};
root: {{ vhost.root }};
}
{% endfor %}
复制代码
3)执行playbook并查看生成结果
复制代码
[root@ansible PlayBook]# ansible-playbook testfor02.yml
去到一个节点看下生成的结果发现自动生成了三个虚拟主机
[root@linux ~]# cat /tmp/nginx_vhost.conf
server{
listen: 8081;
server_name: web1.example.com;
root: /var/www/nginx/web1;
}
server{
listen: 8082;
server_name: web2.example.com;
root: /var/www/nginx/web2;
}
server{
listen: 8083;
server_name: web3.example.com;
root: /var/www/nginx/web3;
}
复制代码
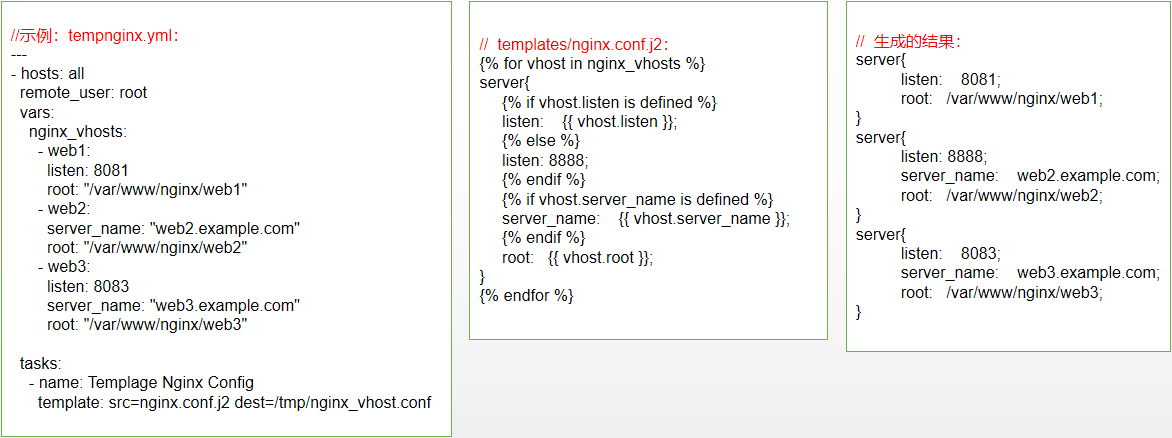
示例3
在for循环中再嵌套if判断,让生成的配置文件更加灵活
1)编写playbook
复制代码
[root@ansible PlayBook]# cat testfor03.yml
template for 示例
hosts: all
remote_user: root
vars:
nginx_vhosts:- web1: listen: 8081 root: "/var/www/nginx/web1" - web2: server_name: "web2.example.com" root: "/var/www/nginx/web2" - web3: listen: 8083 server_name: "web3.example.com" root: "/var/www/nginx/web3"tasks:
- name: Templage Nginx Config
template: src=nginx.conf.j2 dest=/tmp/nginx_vhost.conf
复制代码
2)模板文件编写
- name: Templage Nginx Config
复制代码
说明:这里添加了判断,如果listen没有定义的话,默认端口使用8888,如果server_name有定义,那么生成的配置文件中才有这一项。
[root@ansible PlayBook]# cat templates/nginx.conf.j2
{% for vhost in nginx_vhosts %}
server{
{% if vhost.listen is defined %}
listen: {{ vhost.listen }};
{% else %}
listen: 8888;
{% endif %}
{% if vhost.server_name is defined %}
server_name: {{ vhost.server_name }};
{% endif %}
root: {{ vhost.root }};
}
{% endfor %}
复制代码
3)执行playbook并查看生成结果
复制代码
[root@ansible PlayBook]# ansible-playbook testfor03.yml
去到一个节点看下生成的结果发现自动生成了三个虚拟主机
[root@linux ~]# cat /tmp/nginx_vhost.conf
server{
listen: 8081;
root: /var/www/nginx/web1;
}
server{
listen: 8888;
server_name: web2.example.com;
root: /var/www/nginx/web2;
}
server{
listen: 8083;
server_name: web3.example.com;
root: /var/www/nginx/web3;
}
复制代码
上面三个示例的图片展示效果
例一
例二
例三
